Microsoft OneDrive is a powerful cloud storage solution that makes it easy to store, organize, and access your files from any device. It is a tool to enhance productivity and ensure data accessibility for both individuals and professionals. In fact, over 85% of Fortune 500 companies are using OneDrive. If you are new to using cloud storage or want to enhance productivity, this is the complete Microsoft OneDrive tutorial you need. Here, we will learn 10 practical tips to help beginners get the most out of OneDrive.
What is Microsoft OneDrive?
Microsoft OneDrive is a cloud-based file hosting and storage service from Microsoft. It allows users to save, sync, and access files and photos across multiple devices such as PCs, smartphones, and tablets.
OneDrive integrates deeply with Microsoft 365 apps, so when you collaborate on Word, Excel, or PowerPoint documents, changes are saved automatically and in real time. Besides that, it offers features like Files On‑Demand, Known Folder Move, version history, and a recycle bin to protect your data and give you flexibility in how you store and retrieve files.
Simply put, Microsoft OneDrive is a key tool in modern workflows, as it empowers both personal and business subscribers to benefit from anywhere access, granular sharing controls, and built‑in backup of crucial folders.
Top 10 OneDrive Tips and Tricks to Succeed
Microsoft OneDrive is more than just cloud storage. It is a complete productivity hub integrating file storage, real-time collaboration, and secure sharing across devices and Microsoft 365 apps.
Below, we have shortlisted the top 10 tips for using OneDrive for beginners to improve productivity and maximize their efficiency:
Tip 1: Install the OneDrive App on All Devices
The best tip on how to use OneDrive effectively is to have it installed on all your electronic devices, including computers, smartphones, and tablets. This ensures you can work with files locally while changes automatically replicate to the cloud. Having the app on Windows, macOS, iOS, and Android turns OneDrive into an extension of your file system rather than just a website.
Follow the steps below to install OneDrive:
- Windows 10/11: OneDrive is pre‑installed. Just sign in with your Microsoft account.
- macOS: Download the OneDrive installer from Microsoft’s site and complete the setup.
- iPhone or Android: Install the OneDrive app from the App Store or Google Play, then sign in.

Make sure you use the same Microsoft account to sign in to sync files across devices.
Tip 2: Backup Important PC Folders Automatically
You can manually copy files to OneDrive for backup, but why not use Known Folder Move to protect your Desktop, Documents, and Pictures? This is ideal for OneDrive for beginners, as it automatically redirects and syncs these key folders to OneDrive without requiring manual intervention.
Here are the steps to back up important PC folders automatically:
- Click the OneDrive cloud icon in the system tray.
- Select Settings > Sync and backup > Manage backup.
- Toggle on the Desktop, Documents, and Pictures folders.
- Click Save changes to initiate backup.
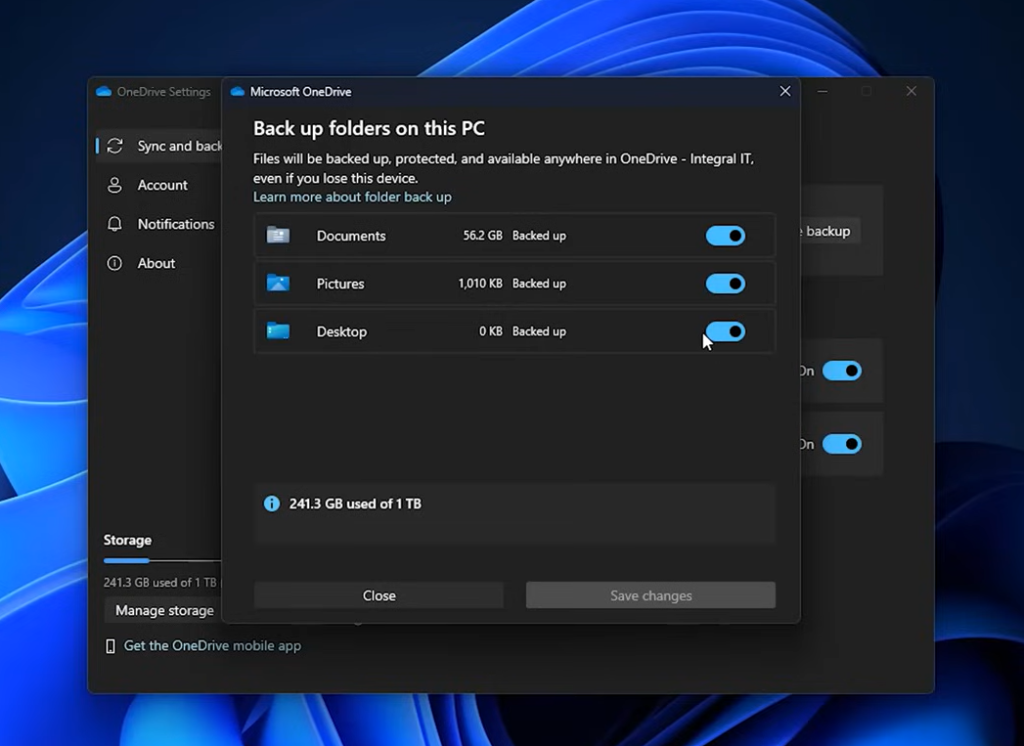
This ensures that your important files are continuously backed up, accessible from any device, and safely stored in the cloud.
Tip 3: Understand OneDrive Sync Status Icons
The next tip in our Microsoft OneDrive tutorial is to understand its sync status icons. OneDrive’s iconography tells you at a glance which files are local, cloud‑only, or in error.
It is crucial to know when learning how to use OneDrive effectively:
- Solid green check: Available offline and in sync.
- Green outline check: Recently synced; offline access guaranteed.
- Blue cloud: Online‑only; needs internet to open.
- Circular arrows: Sync in progress.
- Red cross: Sync error; click the icon to troubleshoot.
Recognizing these icons prevents confusion about file availability, especially when offline.
Tip 4: Use Selective Sync to Save Local Storage
If you have hundreds of gigabytes in the cloud but limited PC storage, selective sync lets you choose which folders to download locally. This is one of the most powerful OneDrive tips and tricks for keeping your hard drive uncluttered.
Follow the steps below to learn how to have selective sync to save local storage:
- Click the OneDrive icon, then Settings > Account.
- Click Choose folders.
- Uncheck folders you don’t need offline, and click OK.
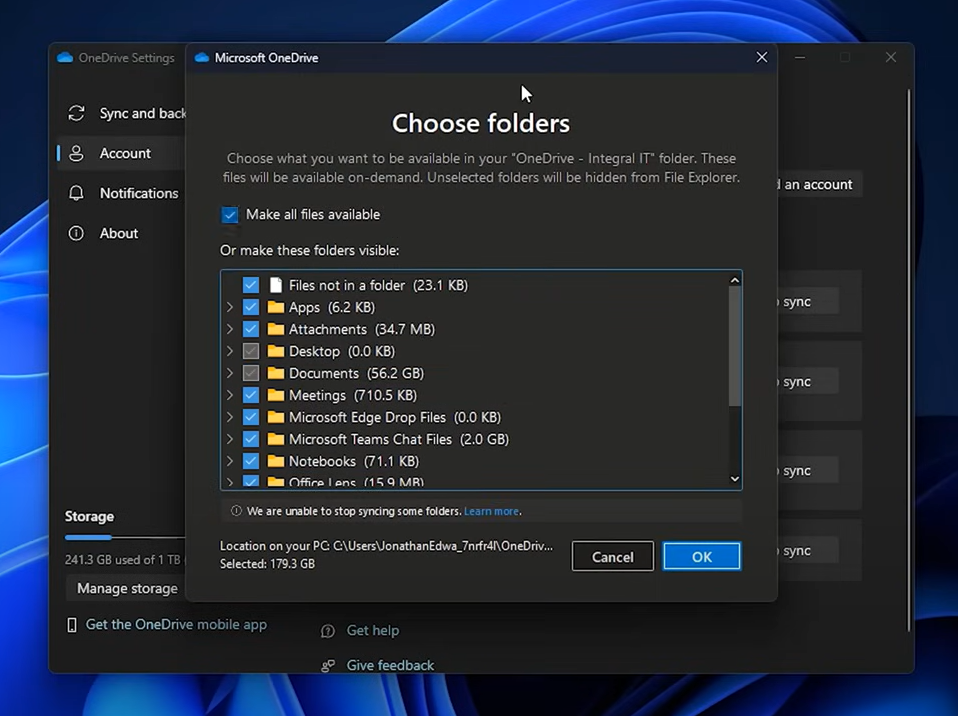
Once done, only the selected folders will sync with local storage.
Tip 5: Color‑Code Folders in the Web Portal
Color coding adds a visual layer of organization. It is useful if you maintain separate personal, work, and project folders. While this applies only in the web interface (not File Explorer), it helps you scan long lists of folders quickly. The steps are as follows:
- In OneDrive on the web, hover over a folder, click the three dots, and choose Customize.
- Select Change color and pick a hue that matches your category.
- Repeat for other top‑level folders to establish a color‑coded scheme.
This way, you can enhance visual appeal with color-coded folders.
Tip 6: Leverage Version History for Recovery
Version history is another useful Microsoft OneDrive tutorial tip for beginners. If you have overwritten a contract or made unwanted edits, OneDrive’s version history lets you roll back to any prior version within the last 30 days. This is one of the vital OneDrive business features, as you can revert back to previous versions effortlessly.
Here’s how to use version history in Microsoft OneDrive:
- Right‑click the file (web or File Explorer) and select Version history. You can also use this feature directly in Microsoft Office apps.
- Review timestamps and click Restore on the version you need.
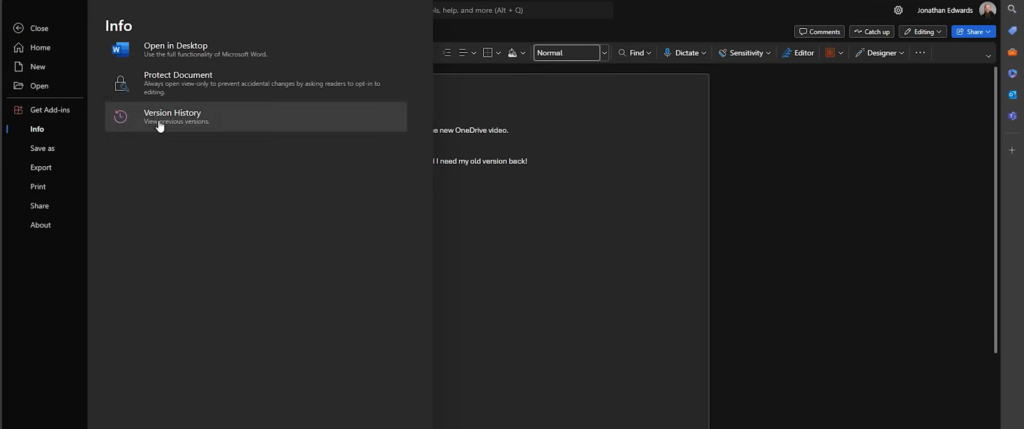
That’s how intuitive it is to return to the file version you find useful.
Tip 7: Utilize the Recycle Bin for Deleted Files
Deleted files in OneDrive aren’t gone forever. They go to the recycle bin for 30 days (and longer under business policies). This safety net is essential for OneDrive for beginners still learning to trust the cloud instead of local Trash folders.
To recover a deleted file in OneDrive, follow these two simple steps:
- In the OneDrive web portal, click Recycle Bin in the left pane.
- Select items and choose Restore.
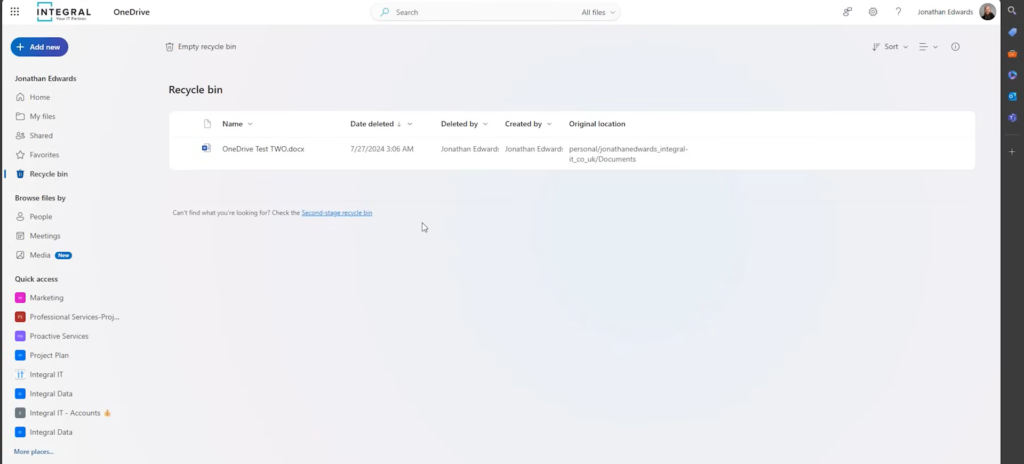
In addition, you can also delete files permanently from this folder.
Tip 8: Share Files and Folders Securely
OneDrive’s sharing controls let you invite collaborators with view‑ or edit‑only permissions, set link expiration dates, and block downloads. This is also one of the key OneDrive business features for secure collaboration. Here’s how to share files/folders securely with OneDrive:
- Right‑click a file/folder and choose Share.
- Enter emails or select Anyone with the link, then set Can view or Can edit.
- (Optional) Set an expiration date or block downloads.
- Click Send or Copy link.
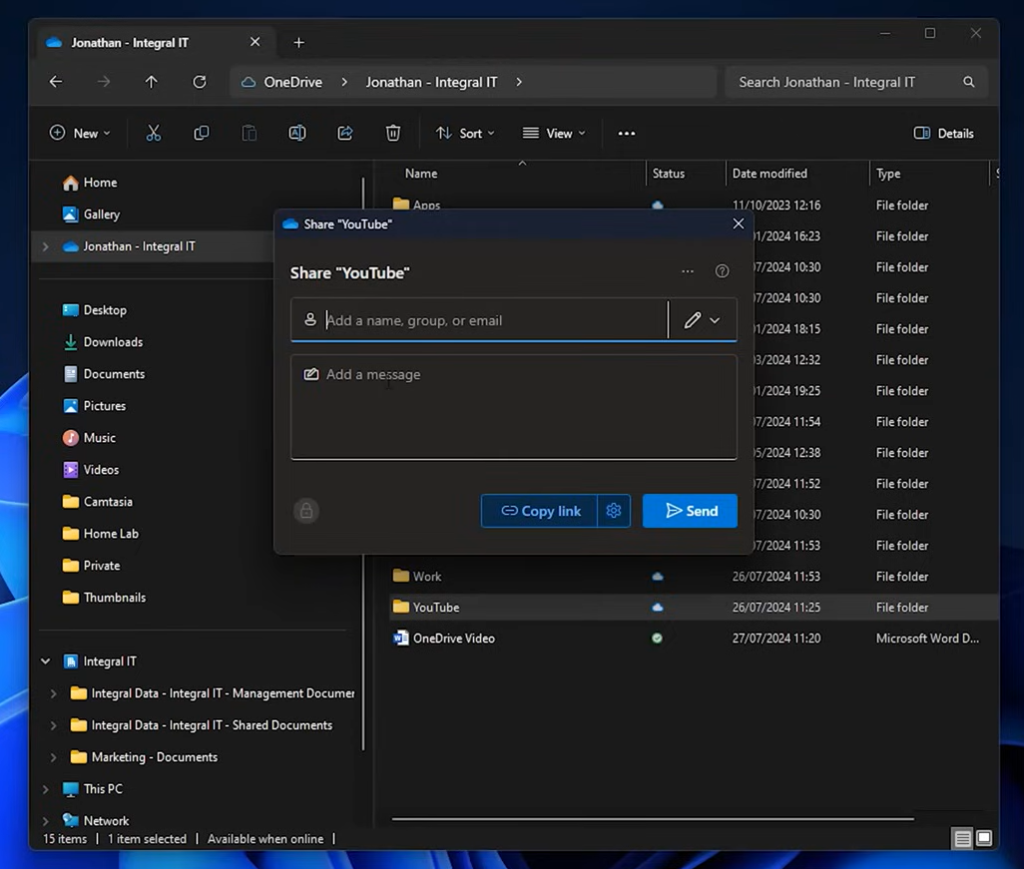
Afterward, the other person can view or edit the content based on your chosen settings.
Tip 9: Go Paperless with Microsoft Lens
Microsoft Lens turns your mobile device into a scanner that saves PDFs or images directly into OneDrive. This is perfect for digitizing receipts, whiteboards, and printed documents. To use Microsoft Lens, follow these steps:
- Install Microsoft Lens from your app store.
- Capture your document in Document mode.
- Crop and apply filters as needed, then tap Done.
- Choose OneDrive as the save location and confirm.
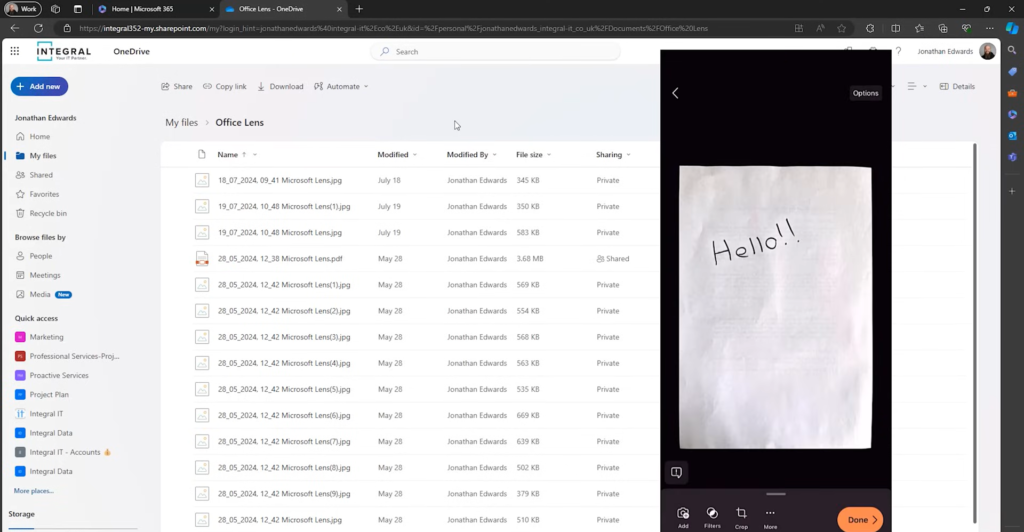
This way, you can use Microsoft Lens to scan and save documents directly to OneDrive and streamline digitizing important papers.
Read more: Top 15 Microsoft Word Tips & Tricks
Tip 10: Save Email Attachments Directly to OneDrive
The last tip in our Microsoft OneDrive tutorial is about saving email attachments directly to OneDrive. Rather than downloading attachments and re‑uploading, use Outlook’s Save to OneDrive command to deposit attachments into a dedicated folder, as follows:
- Open the email with attachments in Outlook (web or desktop).
- Click the down arrow next to the attachment and choose Save to OneDrive.
- Find the file in the Email attachments folder in your OneDrive.
- (Optional) Move it to another folder via Move to.

This way, you can streamline your workflow and keep your inbox clutter-free.
Conclusion
In this Microsoft Outlook tutorial, we have explored ten effective tips on how to use OneDrive effectively. Follow these OneDrive tips and tricks to boost your productivity, keep your files safe, and collaborate more efficiently. Start applying these OneDrive for beginners tips and unlock the full potential.
Looking to get the most out of Microsoft OneDrive for your organization? Sun IT Solutions specializes in helping businesses implement and optimize OneDrive and Microsoft 365 services to improve collaboration, file security, and productivity. Our experienced team offers personalized support, including setting up automatic backups and secure file sharing to training your staff on best practices.
Partner with Sun IT Solutions to unlock the full potential of OneDrive and ensure your data is safe, accessible, and efficiently managed. Reach out today to elevate your cloud storage experience.
